Sunday, December 7, 2014

Chicken Noodle Casserole

I have not baked a chicken in the oven since rotisserie chicken became available from the big box store in my neighborhood.  These moist, plump and flavorful chickens are undeniably better than the ones I made, so I began focusing on sides to accompany this main course.

But when my friend, Michael, introduced me to the vacuum packed bags filled with white meat freshly pulled from the rotisserie chickens and found in the refrigerator display, it changed my world.  I now always have fresh chicken pulled from the bone on hand which has encouraged me to develop interesting, new recipes.


This recipe for Chicken Noodle Casserole is by no means new, but for years it has been one of my heartwarming, comfort foods, so I thought I would share it with you.
Ingredients:
§     2 cans of Cream of Mushroom Soup or homemade Cream of Mushroom Soup (see recipe below)
§     1 1/2 cups milk
§     1/2 cup sour cream (optional)
§     2 cups frozen mixed vegetables …carrots, green beans, corn and peas (I prefer to add peas and corn only)
§     1/2 cups grated Parmesan cheese
§     2 cups of cooked chicken, shredded
§     12 ounces of medium egg noodles, cooked and drained
§     2 sprigs of fresh thyme (optional)
§     1/2 teaspoon kosher salt
§     1/4 teaspoon ground black pepper
§     1 cup shredded Cheddar cheese, divided
§     1/2 stick of room temperature butter or cooking spray to prepare casserole dish.

Directions:

Preheat the oven to 375 degrees.  Bring a medium pot of generously salted water to a boil.  Add the egg noodles and cook until al dente, about 4 minutes and drain.  Prepare casserole dish by buttering with room temperature butter or spray with non-stick cooking spray. 
In a large bowl mix together the soup, milk, sour cream, frozen vegetables, Parmesan cheese, thyme, salt, pepper and 1/2 cup of the shredded Cheddar cheese.
 
Add the cooked chicken and noodles and fold together.
 
Transfer to the prepared casserole dish.  To freeze the casserole for a later time, wrap tightly in plastic wrap and place into the freezer.  To bake, place the casserole dish in a preheated oven until bubbly and lightly brown on top.
 
Before removing from the oven, remove the plastic wrap and sprinkle the remaining 1/2 cup of shredded Cheddar cheese.  Return to oven for 1 – 2 minutes until the cheese melts.
Remove from oven and serve warm.  For a printer friendly copy of this recipe, go to Chicken Noodle Casserole. Enjoy!

Note:  I like my casserole to be creamy, so I bake it wrapped in plastic wrap.  Yes….I bake my casserole while it is tightly wrapped in plastic wrap.  Plastic wrap will not melt unless your oven is over 500 degrees or you have the broiler element turned on. If you prefer a dry, crispy casserole, bake openly or covered with foil.

Homemade Condensed Cream of Mushroom Soup:

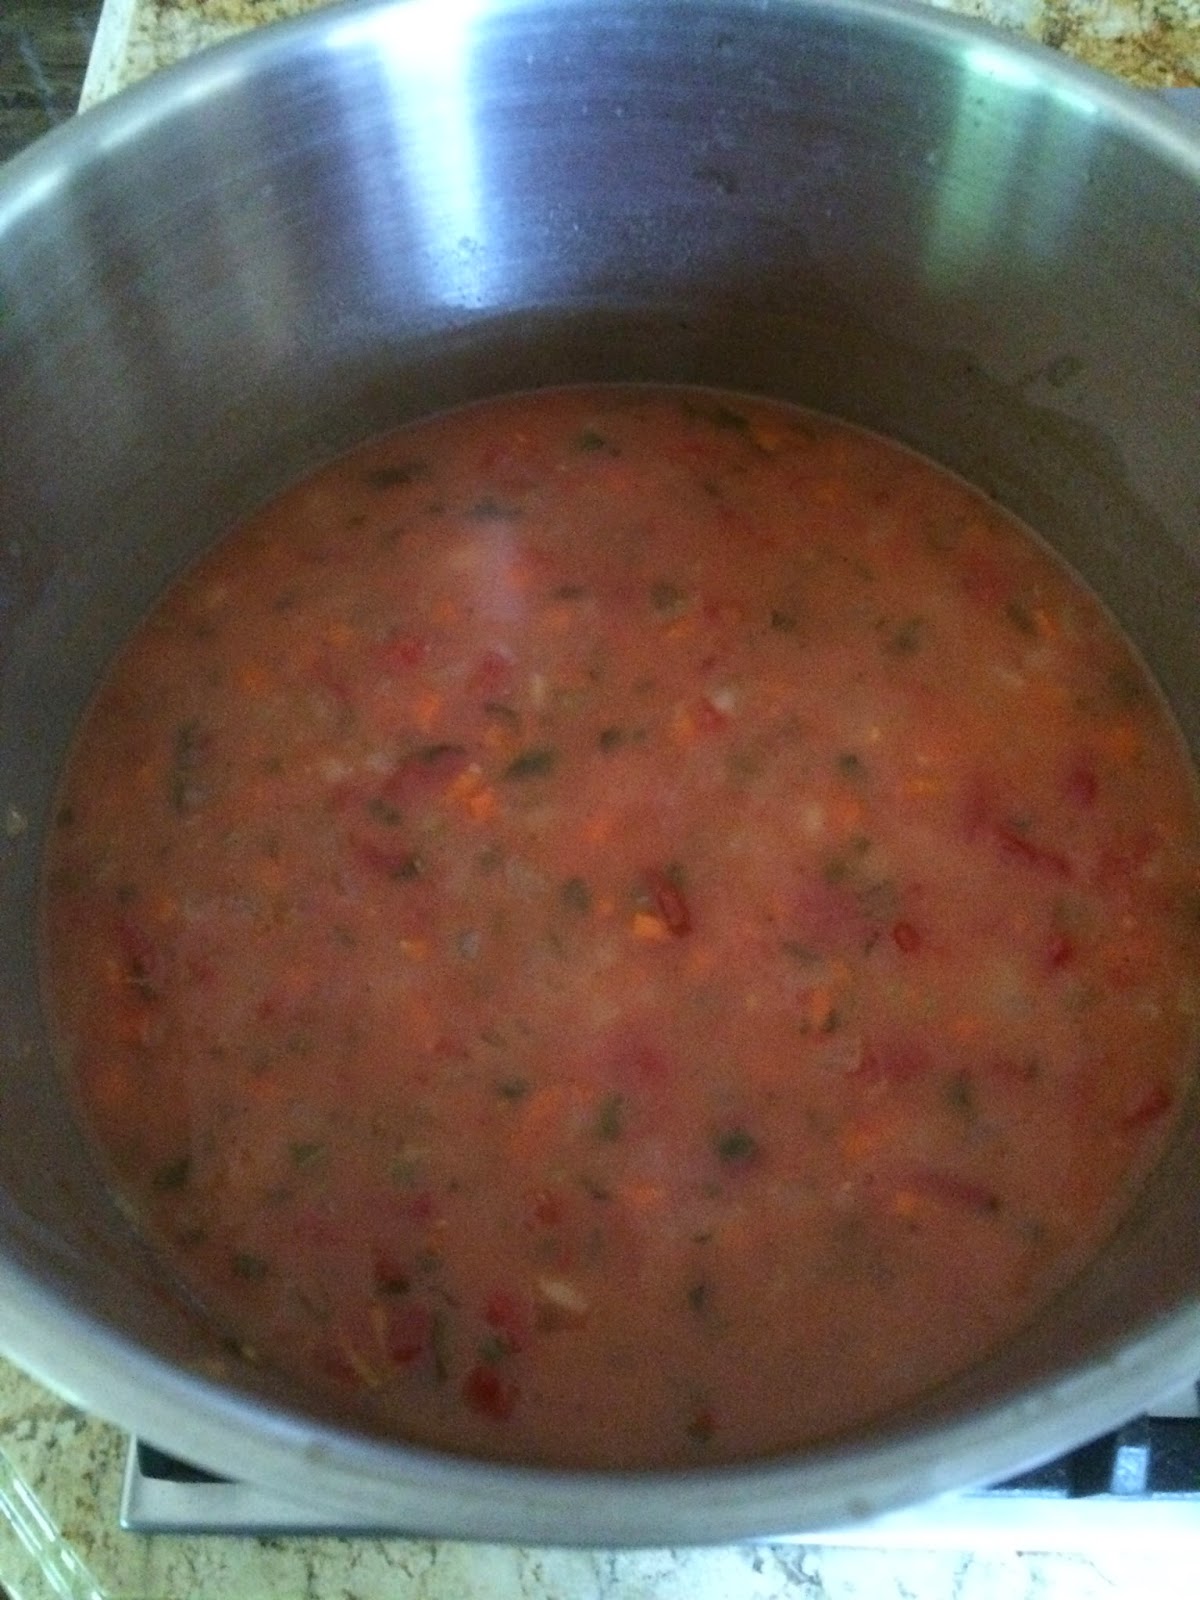
To make homemade Cream of Mushroom Soup first prepare the mushrooms.  Melt 3 tablespoons of unsalted butter in a small Dutch oven.  Add 1/2 pound sliced mushrooms and cook, stirring occasionally, until tender and browned, about 4 – 5 minutes.  After the mushrooms are cooked, add salt and pepper to taste.  (Do not salt the mushrooms while they are cooking as the salt will draw out the water from the mushrooms and they will not brown) Remove from pan and set aside.  To make a roux, melt 3 tablespoons of butter in a small pan. When butter is melted, add 3 tablespoons of flour and whisk together over medium-low heat for a minute or two just to get the raw taste out of the flour.  While whisking, add 1 cup of chicken broth and 1 cup of milk and continue to cook until thick and smooth. To speed up the process, I sometimes pour the broth and milk into a heat resistant cup and warm in the microwave before adding it to the roux.  Once the white sauce is thick and smooth, lower the heat and add the mushrooms.
.
 

Sunday, October 5, 2014

Breakfast Burritos

I am often asked why my breakfast recipes, such as Vegetable Frittata and Breakfast Baskets are vegetarian.  Don't get me wrong.  I love bacon.  Actually, if it wasn’t for my Candy Bacon recipe, I probably would have never started writing this blog.  I couldn’t go anywhere without people asking me for that recipe.  Although I love bacon, when I add it to some dishes or sandwiches, like these Breakfast Burritos, I don’t taste anything but the bacon, so I choose to eat my bacon on the side.  

I started making Breakfast Burritos when summer was over and I needed some quick and easy, go-to-breakfasts while rushing to get out in the morning.  I typically make 8 of them at a time because that’s how many tortilla wraps are in the package.  To freeze, wrap them individually in plastic wrap and place most of them in the freezer.  Be sure to have one or two in the refrigerator, where they can stay fresh for several days.  I fill them with what I like to eat, but feel free to add cooked breakfast meats and/or other vegetables that you prefer.


Ingredients:
§     1 package flour tortillas (8)
§     8 eggs
§     1/4 cup milk or half and half
§     2 teaspoons kosher salt, divided
§     4 tablespoons butter
§     2 - 3 cups grated cheese
§     2 - 3 cups chopped vegetables

Optional:
§     Cooked Breakfast meat (sausage or bacon), optional

Directions:
In a medium sized bowl, add eggs, milk and half of the salt and beat well.
Over medium heat, melt 1 teaspoon butter in a skillet and add 1/2 cup of the egg mixture.  On a separate skillet, warm one tortilla to soften.
 
When the egg sets, flip and cook for another 30 seconds.
Place the cooked egg onto the softened tortilla.  Sprinkle with vegetables, cheese and salt.
 

Wrap the tortilla by folding in the sides towards the center and roll into a cylinder shape. 
To serve immediately, in a skillet, slowly brown the outside on the burrito while melting the cheese on the inside.  To store, wrap each burrito tightly in plastic wrap and freeze until ready to use.  For a printer friendly copy of this recipe, go to Breakfast Burritos. Enjoy!

Sunday, August 3, 2014

Tomato Basil Parmesan Soup

One of my favorite comfort foods is Creamy Tomato Soup with a grilled cheese sandwich, and I shared my go to recipe with you in 2012.  I never felt the need nor set out to replace this recipe until I began experimenting with some ingredients in my refrigerator.
 

It took several tries, but I believe I have improved upon my original Creamy Tomato Soup.  Although it still has the delicious tomato taste, this new version adds body and texture that makes the soup even more satisfying. 

Ingredients:
§     1/4 cup vegetable oil
§     3 cans diced tomatoes with juice
§     1 cup finely diced celery
§     1 cup finely diced carrots
§     1 cup finely diced onions
§     1 tablespoon fresh thyme or 1 teaspoon dried
§     4 tablespoon fresh basil or 1 tablespoon dried
§     1 bay leaf
§     1 tablespoon tomato paste
§     4 tablespoon sugar
§     4 cups chicken broth
§     1/2 cup butter
§     1/2 cup flour
§     1 cup parmesan cheese, freshly grated
§     1 1/2 teaspoons salt
§     1/2 teaspoon black pepper
§     2 cups half and half, warmed

Directions:

Chop onions, carrots and celery.

Heat oil in a 4 quart soup pot.  Add celery, onions and carrots and sauté for 5 minutes.


Add basil, oregano, bay leaf, tomatoes and chicken broth. Bring it to a boil, reduce heat and simmer approximately 15 minutes until carrots are tender.


To increase richness and add tomato flavor, stir in tomato paste.  Add sugar to cut the acidity of the tomato paste.
 

HINT:  Tomato paste freezes well and I use it often to increase tomato richness to recipes.  Whenever I us a tablespoon or two from a can of tomato paste, I freeze the remainder in single tablespoon portions in an ice cube tray or small plastic cup.


While soup simmers, prepare a roux.  In a small saucepan, melt butter over low heat; add flour and cook, stirring constantly, 5-7 minutes.
 

Slowly stir in 1 cup hot soup.  Add another 3 cups and stir until smooth. Add back into soup pot.  Simmer, stirring constantly, until soup begins to thicken.


This chunky soup is beautiful and delicious, but I like mine smoother, so I use an emersion blender for about 5 or 10 seconds which is just enough to chop the vegetables smaller but does not liquefy them.


While whisking to blend, sprinkle Parmesan cheese slowly so it does not clump.


Stir in warmed half and half, salt and pepper. Simmer over low heat 15-20 minutes, stirring occasionally. Makes about 2 quarts (about 8 servings)
 

For a printer friendly copy of this recipe, go to Tomato Basil Parmesan Soup. Enjoy!

Sunday, July 6, 2014

Sour Cream Coffee Cake

I’m a very early riser, so I'm not quite ready for breakfast when I get my first cup of coffee; but while waiting for the Keurig to pour a perfectly brewed cup of French Roast, I like to prepare my taste buds for what’s to come.  I can’t think of a better way to do this than to take a small bite of something sweet. 


Sometimes a cookie is enough to do the job well, but a bite of my Sour Cream Coffee Cake is the perfect beginning to any day.


Ingredients: 
§  16 ounce container of sour cream
§  1 1/2 teaspoons baking soda
§  3/4 cup chopped walnuts
§  1/2 cup sugar
§  2 teaspoon cinnamon
§  1 1/4 cup sugar
§  3 cups flour
§  2 teaspoon baking powder
§  1 1/2 teaspoons salt
§  3 eggs
§  2 sticks butter cut into small pieces
§  2 teaspoon vanilla

Preheat an oven to 350 degrees.  Lightly grease or spray a Bundt baking pan with non-stick cooking spray.  Position rack in center of oven, preheat oven to 350 degrees.  Grease with 2 teaspoons butter and/or spray 12-cup Bundt pan. 


Blend sour cream and baking soda, cover and let sit at room temperature for 30 minutes.


Combine walnuts, ½ cup sugar and cinnamon in a bowl and set aside.
 

Combine flour, baking powder and salt in a bowl and set aside.  In mixing bowl, mix sugar and eggs until fluffy.
 

Add butter and mix for 2 minutes.  Add rum, vanilla and sour cream and mix until well blended.  Add dry ingredients and combine until batter is mixed.  Do not overbeat.
 

Cover bottom of prepared pan with thin layer of batter.  Sprinkle ½ of the nut mixture over top.


Add another layer of batter and top with remaining nut mixture.  Pour remaining batter into pan.


Bake until cake tests done, about 1 hour.  Let cool 5 minutes in pan.
 

Invert onto wire rack and remove pan.
 

For a printer friendly copy of this recipe, go to Sour Cream Coffee Cake. Enjoy!

Friday, June 13, 2014

Bananas Foster

My guests are always impressed when I announce that I am serving Bananas Foster for dessert.  I don’t know if it’s the flambé, the delicious sweet sauce served over ice cream or the belief that they could not reproduce this at home that impresses them so much.  I mainly choose this dessert because it is so easy to make and I typically have all of the ingredients in the pantry.  Frankly, I would rather spend my time and creativity preparing specialty hors d’oeuvres, appetizers and whatever I’m serving as the entrée. 
To make it even easier, early in the day I measure out all of the ingredients and place the sugar, butter and cinnamon on a disposable plate and place the liquor and rum in small disposable cups which I set on the frying pan and store on a shelf in my pantry until I’m ready to make the dessert.  By using disposables, this becomes a ‘one pan dessert,’ for easy clean up.  After clearing the dinner dishes I retrieve the frying pan from the pantry and begin preparing the Bananas Foster.  At this point all I have to do is slice the bananas which I do while the butter is melting. Quick, easy and impressive….it doesn’t get better than that.
 

HINT:
No matter how many bananas I buy, I always have one or two that are ripe and uneaten.  I peel and wrap the banana in plastic wrap and place it in the freezer.  Whenever I want to make Bananas Foster or bake banana bread, I simply remove it from the freezer and unwrap an unblemished banana with which to bake.

Ingredients:
§     4 ripe bananas, peeled
§     4 tablespoons unsalted butter
§     1 cup packed light brown sugar
§     3/4 teaspoon ground cinnamon
§     1/4 cup banana liqueur
§     1/2 cup dark rum
§     1 pint good quality vanilla ice cream
Directions:
Cut the bananas in half across and then lengthwise. Melt the butter in a large skillet over medium heat.
Add the brown sugar and cinnamon and cook, stirring, until the sugar dissolves, about 2 minutes.
Add the bananas and turning, cook on both sides until the bananas start to soften and brown, about 3 minutes.
Add the banana liqueur and stir to blend into the caramel sauce. Carefully add the rum and shake the pan back and forth to warm the rum and flame the pan. (Or, off the heat, carefully ignite the pan with a match and return to the heat.)
Shake the pan back and forth, basting the bananas, until the flame dies. 
Divide the ice cream among 4 dessert plates. Gently lift the bananas from the pan and place 4 pieces on each scoop of ice cream. Spoon the sauce over the ice cream and bananas, and serve immediately.  For a printer friendly copy of this recipe, go to Bananas Foster. Enjoy!

Sunday, May 4, 2014

Croque Monsieur and Croque Madame

My Facebook friends know that I recently returned from a wonderful, 10 day vacation in Paris, Venice, Florence and Rome.  When I travel I always like to sample the local cuisine. When I go to New York, I make sure to eat the world famous pizza I grew up on.  When I travel throughout the south, I indulge on barbecue.  In New Orleans I can't wait to eat Gumbo, and when I'm in Puerto Rico, my mouth starts watering when I think of the first bite of mofongo.  So it was no surprise to anyone when I ate my way through Europe and posted daily pictures onto Facebook to prove it. 

When we arrived in Paris, I couldn’t wait to get to a French Bistro to eat my favorite French signature sandwich, Croque Monsieur or Croque Madame.
 
For those of you who are unfamiliar, Croque Monsieur is the French Grilled Ham and Cheese Sandwich made with a creamy Béchamel.  A Croque Madame is a Croque Monsieur topped with a fried egg.  I’ve been home for several weeks and I can’t get this delicious sandwich which can be prepared for brunch, lunch or dinner off my mind.  With this recipe, it’s so simple to make, I don’t have to.

Béchamel Ingredients
§  2 tablespoons unsalted butter
§  2 tablespoons all-purpose flour
§  1 cup whole milk
§  Pinch of freshly grated nutmeg
§  1 small bay leaf
§  Salt and pepper to taste

Sandwich Ingredients
§  4 slices firm white sandwich bread
§  2 teaspoons Dijon mustard
§  1/4 pound thinly sliced cooked ham (preferably Black Forest)
§  1/4 pound coarsely grated Gruyere cheese, divided into 4 equal piles
§  4 tablespoons unsalted butter
§  2 large eggs

For the Béchamel :
Melt 2 tablespoons butter in small saucepan over medium heat. Add flour and stir 1 minute.

Gradually whisk in milk. Add nutmeg and bay leaf. Increase heat to medium-high and boil and continue whisking until sauce thickens, about 2 minutes.  Remove and discard the bay leaf.  Season with salt and pepper. 
For the Sandwich:
Preheat broiler. Place 2 bread slices on work surface.  Spread 2 slices of bread with Dijon mustard and top with half of the ham.
 
On the remaining 2 slices of bread, spread 1 1/2 – 2 tablespoons of Béchamel and sprinkle each with 2 ounces (1 pile) of the Gruyere cheese.
Close to form two sandwiches. 
In a skillet over low heat, melt 2 tablespoons of unsalted butter.  Add both sandwiches to the skillet and cook until deep golden brown, about 2 minutes per side. 
Transfer to a small taking sheet.  Spoon the béchamel sauce over both sandwiches and top with remaining cheese.
 
Broil until the cheese begins to brown, about 2 minutes.  Your Croque Monsieur is finished and ready to eat. 
I, however, prefer the Croque Madame sandwich.  To make the Croque Madame, heat the remaining 2 tablespoons of butter in a skillet over moderate heat until foam subsides, then crack eggs into skillet and season with salt and pepper.
Fry eggs until whites are just set and yolks are still runny, about 3 minutes. Top each sandwich with a fried egg and serve immediately.
For a printer friendly copy of this recipe, go to Croque Madame. Enjoy!